
I made this adorable I heart you footprint keepsake for my mother-in-law (a copycat of one I saw on Etsy) and I want to share with you how I did it so you can make one too.

I *Heart* You Grandma
From the top of my head
To the tips of my toes
Love always,
Brielle Joyce
The funny thing (to me anyways) is that I originally did my baby’s footprints for an entirely different project, which I never ended up doing. (I was going to do one of those cute butterfly paintings where the feet are the wings, but never got around to painting the butterfly.) I kept the piece of paper anyways and found a way to use the footprints for as many projects as I want.
I went a bit high tech in my methods for this project, but you certainly don’t have to! If you are good at painting or writing letters there is no need to use a computer at all. But if you aren’t, and you have photo editing software then you can easily create this project on your computer. I will break down the low and high tech methods separately.
I Heart You Footprint Tutorial
For this project you will need:
- paint brush
- water-based paint in your chosen color (mid to dark tone works best)
- white card stock (1 or 2 sheets)
High Tech method:
- all of the above plus:
- photo editing software such as Photoshop
- scanner and photo printer with photo paper
Low Tech Method:
1. Use a paintbrush to apply paint to the bottom of both of your baby’s feet.
2. Make an impression of each foot onto a white sheet of card stock. You will need to angle and overlap the footprints so they resemble a heart shape (see the picture above), placing the heart near the top of the paper with room for the letter “I” above.
3. Use your paintbrush to paint the large words and a felt pen to write the smaller words.
4. Dry and frame, easy peasy!
High Tech method:
1. Use a paintbrush to apply paint to the bottom of both of your baby’s feet.
2. Make an impression of each foot onto a white sheet of card stock. You can do them in a heart shape by angling and overlapping the footprints (see the picture above), or if you want to be able to reuse them for more projects, do the footprints separate from each other.
3. Scan the footprints into your computer (at 300 ppi print resolution) and open the image file in Photoshop. For heart-shaped prints, you can either adjust the curves on the image so the paper background appears white, or you can remove it using the magic eraser tool.
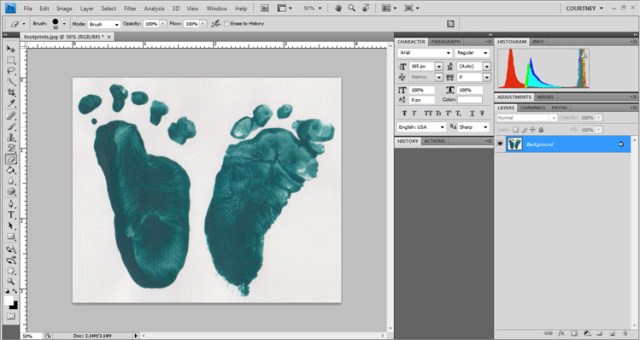
If you did your footprints apart (not heart shaped)
3a. Remove the grayish paper background using the “magic eraser tool”:

The magic eraser settings of Tolerance-32, continuous worked perfectly for mine, but you may need to experiment to find what works best on yours.
3b. At this point I used the regular eraser tool to remove the smudge below the right heel, and if you have any imperfections on yours now’s a good time to erase them.
3c. Now make sure you save as a .psd for future use. Now you are able to place the footprints over any background you wish, and even change the color. (And you don’t have to keep getting prints from a wiggly baby with painted feet!)
3d. Next, use the crop tool to crop the image to only the left footprint.

4. Create a new file the size of a standard sheet of paper (8.5 x 11 inches) with a white background and 300 ppi resolution. CMYK is comparable to your printer’s color (while RGB is computer color scheme) so choose that for accurate color printing.

5. Copy the footprint layer into this file.
If separate, drag the first cropped footprint in this file,

then undo your crop, crop to the other footprint,

and then drag that into your file. Arrange the footprints into a heart shape by rotating them and overlapping them.
When you copy the footprints into the new file, you will probably see this warning because you are moving from RGB color space to CMYK color space:

Click yes.
6. If desired, add adjustment layers to change the look of your footprint heart if you would like it lighter/darker, more/less contrast, different color hue etc. I used the curves layer to bring up my black levels to get a brighter blue.

7. Use the font tool to add the text. Because the footprints have a painted appearance, I wanted a font that looked like it was written with a paint brush. I did a quick Google search for free paint font and easily found one. Downloaded, checked for viruses, installed and restarted Photoshop, ready to use in only a couple minutes. (I love free fonts 🙂 )
For the smaller text I chose a simpler, handwritten style font and then for the “love always…” part I picked a cute font with hearts (another free download!). Feel free to experiment with different fonts to get the look you want.

8. Print it onto photo paper or card stock and put it in a simple white document frame. You could also put it in an 8×10 frame, but you must leave enough border around your text so that you can trim the paper to 8×10 after it’s printed.
Your baby’s Grandma is going to love this footprint keepsake. You could also make this for a first Father’s Day gift, or for grandpa, aunt, uncle, godparent…
I can’t wait to give mine to my Mother-in-Law. And now that I have my baby’s footprints in Photoshop, I’m excited to think of all the keepsake projects I could do with them!
If you have any questions about doing this yourself send me a comment and I’ll try to help!
Want a free pdf download of this tutorial to keep handy? Follow I Watch Them Grow to get this Exclusive Freebie!
[mailerlite_form form_id=2]


10 Comments
Are you able to do different colors of the footprint than what is scanned?
Hi Erica, yes you can change the color of your scanned footprint by using the “color overlay” feature in your photo editing software. If you have Photoshop, you would double click on the footprint layer to open up the layer style options. Click on color overlay, and choose a color from the color selector. Set the opacity to between 50% to 60% in order to change the color but keep the footprint details (light and dark lines). I was able to change mine from blue to pink and some other colors easily, but a few colors like yellow and green didn’t work as well for keeping the detail, so I think it depends on the color you are starting with. Does that help?
I’m featuring this on Babycenter this week–one picture and link–please let me know if that’s not okay! Thank you, it’s a fantastic tutorial!
[…] 1. I Heart You Footprint Tutorial […]
[…] 5. I Heart you Footprint […]
[…] What grandmother wouldn’t love this piece of art?! I just need it to say Mama instead of Grandma. I found this on I Watch Them Grow. […]
Cool idea!
Thx for the detailed description and tutorial!
Glad you liked it! Thanks for your comment 🙂
wonderful tutorial! I was wondering what fonts you used.
Thank you! The fonts are LeviBrush, French Script MT and MiniHeartFont 🙂